By Gadjo Cardenas Sevilla
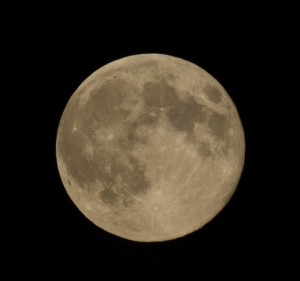
We’ve been fortunate to have not one but two Supermoon events in quick succession. There is one happening tonight, here’s how to shoot for the moon.
The Supermoon is an amazing astronomical event, it happens when a full moon or a new moon coincides with the closest approach the Moon makes to the Earth on its elliptical orbit, resulting in the largest apparent size of the lunar disk as seen from Earth. Supermoons are 12% bigger and 30 % larger, this means that if photographed properly, you can grab some truly stunning photos of the moon.
What you need
Many people think that shooting the supermoon requires a lot of astrophotography gear, not really. Let’s start with a good ultrazoom point and shoot camera or interchangeable lens camera that’s got as many megapixels as possible and the longest lens you can work with. Even a relatively inexpensive point-and-shoot camera can be used, provided you’re willing to work with the settings. For the photo above, I used an Olympus OM-D E-M1 and the largest zoom in my collection, a Zuiko 70-300mm lens.
A tripod is essential because you need to keep the camera stable, specially if you have a heavy lens. A good tripod will allow you to get just the right angle and lock the camera into position while you compose and take your shot. That is, at least for the duration that the supermoon is within range, remember, it is a moving target after all.
A good location is also very important. Living in the city, surrounded by buildings and light pollution makes getting a good shot difficult. For the Supermoon photo I took last month, I had to hunt around for the moon and was lucky enough to find a space across a parking lot that gave me a good vantage point. If you live in an open area, far from the city, you’ll likely get a better shot sooner. Although, many dramatic supermoon shots include elements such as buildings or recognizable places just for reference.
Finally, patience is something you will need. That, and the determination to try various settings with your camera in order to capture this stunning imagery. It helps if you’re familiar with your equipment and can use the manual controls.
Settings to consider
You want to get out of automatic settings and move to manual or aperture priority mode. The great thing about digital cameras is that their Live View feature allows you to see what the photo will be like given the current settings. It is therefore easy to make adjustments on the fly in order to get the best detail.
Focus manually, disable the camera’s built in image stabilization feature since this tries to counter shake (you’ve got it on a tripod, after all).
Use a remote trigger or the built in timer. Any movement will affect a photo specially if you’re using a large zoom lens, I use a two or ten second timer setting once I’ve centered and focused on the target.
Use Spot Metering, since this will try to get the best light reading once you have centered on the moon. This is a tricky part, the good thing is you can take various pictures and play them back to adjust focus.
Shoot the largest possible JPEG size or use RAW capture. While shooting a great image in camera is always the objective, having as many pixels available helps in tweaking and post processing with software. Capturing photos in RAW ensures you have more flexibility to increase contrast, brightness and saturation on a granular level to make your photo pop even more.
Go for the lowest ISO setting for natural light and greater detail, but it helps to play with controls and adjust accordingly. FInally, take as many pictures and variants as possible since you never know when you might capture a gem. I took around 150 shots my first try, 12 of which were good enough and around three that were outstanding. Since we’re not using film, we can take as many shots as possible without worrying about wasting money of developing film.
Conclusion
Shooting the Supermoon is challenging but not impossible. You might already have all the necessary tools to go and capture this magnificent gift of nature.


